Using the Natural Anatomy of the Ear to Create Hidden Scars in a Deep Plane Facelift
March 03, 2026 | Facelift
A deep plane facelift and neck lift, performed in the traditional way, removes excess skin through incisions placed on the outer portions of the face. The idea of visible scars may understandably concern patients — however, when these incisions are thoughtfully planned and executed, the resulting scars can be extremely difficult to see.
Let’s break the location of scars into three distinct zones, with particular emphasis on those around the ear.
Zones I and III: Hairline Incisions
Both of these zones involve incisions placed immediately adjacent to — or, in the case of Zone III, actually within — the hair-bearing scalp. To make these scars difficult to see, one strategy is to cut in a wavy or irregular pattern that replicates the natural variation of a hairline. Additionally, the angle of the scalpel where it passes through hair follicles can be oriented in a way that encourages hair to grow directly through the scar itself, further concealing it.
In Zone III, where the incision sometimes extends into the scalp, it is important that when the skin and scalp are advanced, the resulting hairline remains properly aligned — with no visible steps or notches.
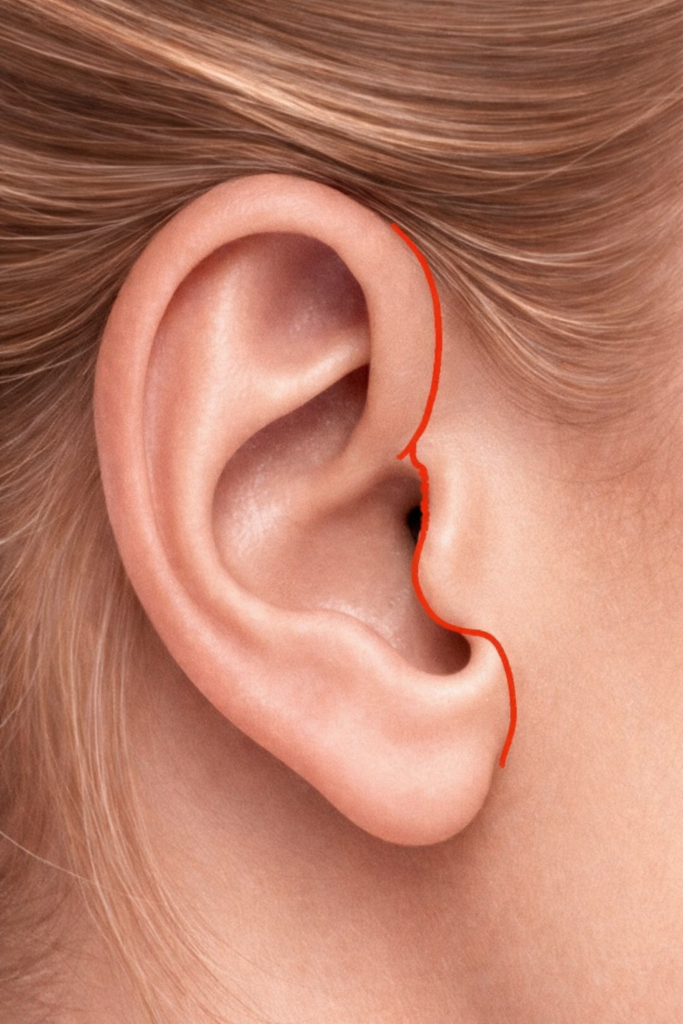
Zone II: Incisions Around the Ear
The ear is where the anatomy of the structure itself can be most powerfully leveraged to make scars nearly invisible. The ear represents a natural transition from one skin tone to another — the cheek and temple skin is often a different color than the skin of the ear itself. This transition zone is an ideal location for an incision, as the color difference acts as natural camouflage.
“The ear represents a natural transition from one skin tone to another — and this color difference acts as camouflage for a well-placed incision.”
The Tragus
One incision can be placed entirely out of view by positioning it along the border between the front and back surfaces of the tragus — the small cartilaginous projection in front of the ear canal. This intratragal incision is not visible even when the face is viewed directly from the side.
The Crease Below the Tragus
Just in front of the earlobe, there is often a fine natural crease — present even in younger individuals — where an incision can be placed in a way that is very difficult to detect.
The Earlobe Junction (Incisura Lobuli)
The junction of the earlobe and the face is called the incisura lobuli. This area must be respected carefully: leaving 1 to 2 mm of skin on the lobular side preserves the natural crease at that transition, keeping the scar inconspicuous and preventing the earlobe from becoming pulled or distorted.
The Postauricular Sulcus
In the postauricular region — the area behind the ear — the incision should be placed precisely at the depth of the sulcus (the groove between the ear and the scalp) and should follow its natural curvilinear contour. When sutures are used to anchor the skin into that sulcus, the resulting scar becomes virtually invisible.
The Root of the Helix: Using Color and Continuity
The helix is the outer rim of the ear, most prominent in the upper half. The root of the helix is where that rim curves around and anchors back onto the face — and it is here that a noticeable color difference between the facial skin and the ear skin exists. Placing an incision at this transition takes advantage of that natural contrast.
There is also a useful visual principle at work here. The eye has difficulty distinguishing the end of a structure when presented with a smooth, continuous line. The helix technically ends where it meets the temple skin, but if the incision at the root of the helix is made such that the distance from the scar to the posterior border of the root equals the width of the helix above it, the eye perceives a continuous curved line — seamlessly transitioning from the outer border of the helix to the scar itself — making the scar far less noticeable.
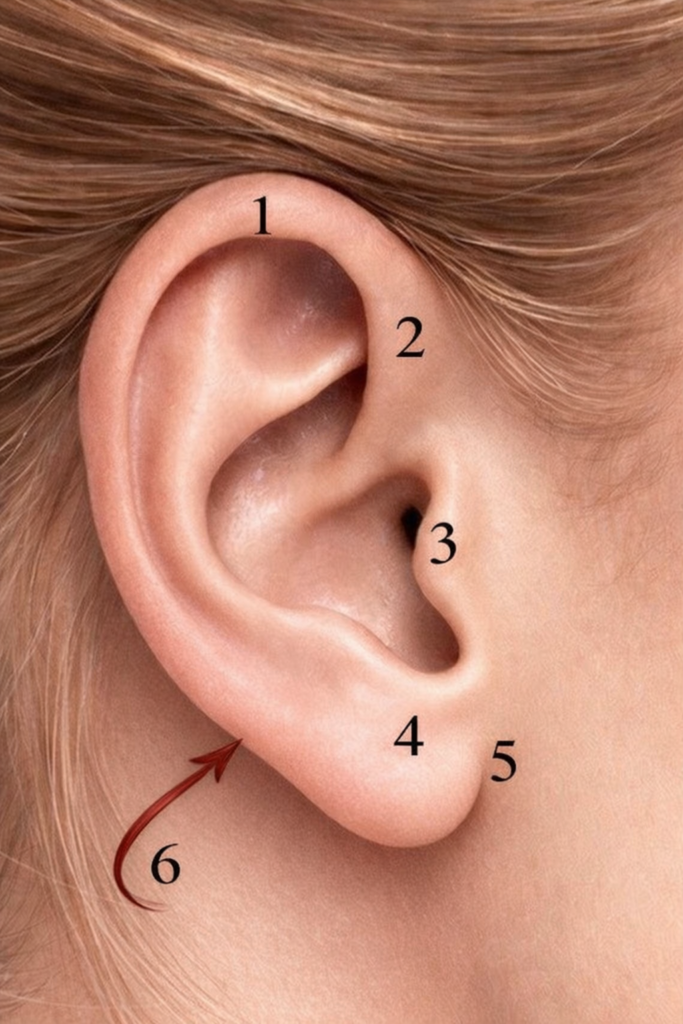
- 1 Helix
- 2 Root of the Helix
- 3 Tragus
- 4 Earlobe
- 5 Incisura Lobuli
- 6 Postauricular Sulcus
Summary
The natural contours of the ear, when respected, are ideal for creating scars that are very difficult to see. As long as incisions are placed without creating tension on the ear or earlobe — which can lead to a pixie ear deformity — the natural anatomy can be used to great advantage.
Matching the incision width at the root of the helix to the width of the helix above it creates a continuous visual line that conceals the scar. Placing the incision at the transition between the outer and inner surfaces of the tragus hides it from view entirely. Utilizing the natural crease just in front of the earlobe is another effective strategy. Maintaining a 1–2 mm skin cuff at the earlobe preserves the natural crease and keeps the scar inconspicuous. And tucking the skin behind the ear into the postauricular sulcus creates yet another opportunity for a virtually invisible result.
Frequently Asked Questions
“`Schedule a Consultation
For more information on Dr. Adam Bryce Weinfeld, M.D., Aesthetic Facial Plastic Surgeon in Austin, Texas, explore the rest of this site or reach out directly.
Contact Dr. Weinfeld